iOS14 Widget 开发 101

我们直接从创建 Widget Extension 开始。
创建 Widget Extension
Widget 是一个 App Extension,和主 App 本质上是两个进程,所以后续我们需要解决一些基础设施的问题。不过在完成创建之前,我们会面临是否需要勾选「Include Configuration Intent」的问题。

那么,Configuration Intent 是什么呢?
Configuration Intent
Widget 支持用户在不打开 App 的情况下,对 Widget 进行一些配置。比如天气应用的 Widget,可以设置当前的位置信息。

Configuration Intent 即是用于定义用户在编辑 Widget 时看到的配置页面,如果勾选的话,会自动创建一个和 Widget 同名的 SiriKit Intent Definition File,其使用和 Siri Intent File 基本类似,在配置 Widget 的部分会再详细说明。
认识 Widget
接下来先看下我们创建了 Widget Extension 后 Xcode 为我们生成的代码,主要有以下几个结构,
- Widget
- View
- TimelineEntry
- TimelineProvider
- PreviewProvider
PreviewProvider 是用于在 Canvas 上实时预览。另外 Widget、View 和 Timeline Provider 之间的关系如下,
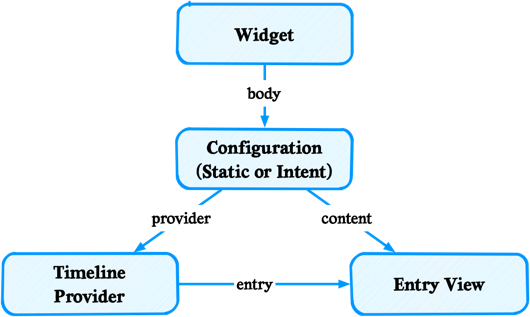
可以对照 Xcode 帮我们生成的 Widget 的实现一起来看,
@main
struct ProgressWidget: Widget {
    let kind: String = "ProgressWidget"

    var body: some WidgetConfiguration {
        IntentConfiguration(kind: kind,
                            intent: ConfigurationIntent.self,
                            provider: Provider()) { entry in
            ProgressWidgetEntryView(entry: entry)
        }
        .configurationDisplayName("My Widget")
        .description("This is an example widget.")
    }
}
Widget 是一个协议,它只定义了一个变量 body, body 是遵守协议 WidgetConfiguration 的变量,可以有两种类型(对应前面提到的,在创建 Widget Extension 时是否勾选「Include Configuration Intent」),
StaticConfiguration,对于没有用户可配置属性的 Widget,也就是用户无需配置,展示的内容只和用户信息有关系。比如 Keep 的 medium 大小的 Widget。IntentConfiguration,用于支持用户配置的 Widget。需要注意的是,IntentConfiguration 是通过配置而非代码编写来实现,Xcode 会根据配置生成对应的代码。
为了初始化 Configuration,还需要提供以下信息(以 IntentConfiguration 为例),
/// Creates a configuration for a widget by using a custom intent
    /// definition to provide user-configurable options.
    /// - Parameters:
    ///   - kind: A unique string that you choose.
    ///   - intent: A custom intent definition containing user-editable
    ///     parameters.
    ///   - provider: An object that determines the timing of updates
    ///     to the widget's views.
    ///   - content: A view that renders the widget.
    public init<Provider>(kind: String,
                          intent: Intent.Type,
                          provider: Provider,
                          content: @escaping (Provider.Entry) -> Content) where Intent == Provider.Intent, Provider : IntentTimelineProvider
- kind*,是我们为每个 Widget 定义的唯一标识,后续当我们想要刷新某个 Widget 时,该值可以定位到唯一的 Widget
- intent*,对应的是 Siri Intent File 中定义的 Intent,StaticConfiguration 没有该参数
- provider,IntentTimelineProvider,用于向 WidgetKit 提供 Timeline,这个稍后细说
- content,返回一个 SwiftUI View,即对应 Widget 的视图部分(这是一个
() -> Content类型,关于这个的更多讲解,可以参考喵神的 《SwiftUI 的一些初步探索 (一)》)
理解 Timeline
与 App 不同的是,Widget 的内容并不是实时渲染的,而是根据 Timeline 展示的一组静态视图。WidgetKit 通过调用 TimelineProvider 的 getTimeline 方法来获取 Timeline 并展示。
func getTimeline(for configuration: ConfigurationIntent, in context: Context, completion: @escaping (Timeline<Entry>) -> ()) {
        var entries: [SimpleEntry] = []

        // Generate a timeline consisting of five entries an hour apart, starting from the current date.
        let currentDate = Date()
        for hourOffset in 0 ..< 5 {
            let entryDate = Calendar.current.date(byAdding: .hour, value: hourOffset, to: currentDate)!
            let entry = SimpleEntry(date: entryDate, configuration: configuration)
            entries.append(entry)
        }

        let timeline = Timeline(entries: entries, policy: .atEnd)
        completion(timeline)
    }
Timeline 由多个时间轴条目 TimelineEntry 以及一个刷新策略 ReloadPolicy 组成。
-
TimelineEntry必须包含一个date的时间对象,用以告知 WidgetKit 在何时使用此对象来创建 Widget 的视图。 -
ReloadPolicy决定 WidgetKit 何时请求后续的 Timeline。在生成新的 Timeline 之前,WidgetKit 会一直使用上一次生成的 Timeline 来展示数据。
既然知晓了 Widget 是由 Timeline 构成的一组静态视图,那么如何刷新内容呢?
Widget 刷新方法
Widget 的刷新方法分为两类,
- System reloads
- App-driven reloads
System reloads
由系统发起的 Timeline 刷新。系统决定每个不同的 Timeline 刷新的频次。高频使用的 Widget 可以获得更多的刷新频次。刷新策略对应创建 Timeline 时指定的 Reload Policy。
Reload Policy 有以下三种,
atEnd: 是指在当前 Timeline 的所有 entry 显示完毕后刷新atAfter: 是指指定的下次刷新的时间,系统会在这个时间对 Timeline 进行刷新never:是指以后不需要刷新了。最后一个 entry 展示完毕之后 Widget 就会一直保持那个 entry 的显示内容,什么时候需要重新刷新需要 App 重新告知 Widget
App-driven reloads
-
当应用在前台运行的时候,App 可以直接使用 WidgetCenter 的 API 来 Reload Timeline
-
当应用处于后台时,可以使用后台推送(Background Notification)来 Reload Timeline
func userNotificationCenter(_ center: UNUserNotificationCenter, didReceive response: UNNotificationResponse, withCompletionHandler completionHandler: @escaping () -> Void) {

    if response.actionIdentifier == "actionIdentifier" {
				WidgetCenter.shared.reloadAllTimelines()
     		// WidgetCenter.shared.reloadTimelines(ofKind: "KindOfWidget")
    }

    completionHandler()
}
绘制 UI
Widget 必须使用 SwiftUI 进行开发,同时由于 Widget 展示在主屏幕上,并不是所有的 SwiftUI 控件都支持,通过 UIViewRepresentable 包装的控件都不支持,比如 SwiftUI 的 ProgressView 控件。可以支持的控件列表可以参考 SwiftUI Views 。
除此另外,Widget 不支持滑动交互,也不支持展示视屏和动图。
快速入门 SwiftUI
为了推广 SwiftUI 苹果出了一个很棒的互动教程 《SwiftUI Tutorials》 来帮助我们快速入门。对于 Widget 开发,可以先关注如何使用 SwiftUI 的 UI 组件、样式设置、布局和交互这几部分内容。
UPDATE 2020.12.30: 苹果今年还推出了新的 SwiftUI 教程,以开发一个比较完整的 App 作为主要内容。
获取数据
Widget 主要有两种获取数据的方式,
- 通过 App Group 与主 App 共享数据
- 通过网络请求获取数据
App Group
因为 App 和 App Extension 是不能直接通讯的,所以需要共享信息时,需要使用 App Groups 来进行通讯。App Groups 有两种共享数据的方式,分别通过UserDefaults和FileManager。UserDefaults 声明以 App Group ID 为 suiteName 的实例即可,使用 FileManager 则可以通过调用 containerURLForSecurityApplicationGroupIdentifier 方法。
#if KEEPBETA
static let kGroupId = "group.com.kp.keepbeta.widget"
#else
static let kGroupId = "group.com.gotokeep.keep.widget"
#endif

let sharedStore = UserDefaults(suiteName: KEPWidgetContentLoader.kGroupId)
网络请求
Widget Extension 支持进行网络请求,可以在取 snapshot 或者 timeline 的代理方法中被调用。可以直接使用 URLSession,如果需要使用 App 中的网络框架,那么需要网络框架支持 Widget Target。
交互
Widget 和 App 交互有两种方式,
- Widget 特有的 widgetURL API,一般 small 使用
- SwiftUI Link API,一般用在 medium 和 large 上,可添加到 SwiftUI View 上
这两种方式的本质都是 URL Schemes,调用后在 App 的 application:openURL:sourceApplication:annotation: 方法中处理即可。
动态配置
前面已经提到过 IntentConfiguration 和 StaticConfiguration 的区别,为了使 Widget 可配置,需要完成以下任务,
- 创建 Intent Definition File,Widget 的可配置的参数列表是使用 Intents 进行配置的。Intents 是 Apple 在 WWDC 2016 引入的概念,参见 Introducing SiriKit 和 Introduction to Siri Shortcuts
- WidgetConfiguration 的 Provider 需要对应使用
IntentTimelineProvider。其 API 与 TimelineProvider 的基本一致,只是增加了 configuration 的参数,用于获取用户的选择 - 如果可编辑的选项是动态的,比如天气应用中,可以动态地加载城市列表,那么还需要实现 Intent Extension
IntentDefinition 文件
参数类型
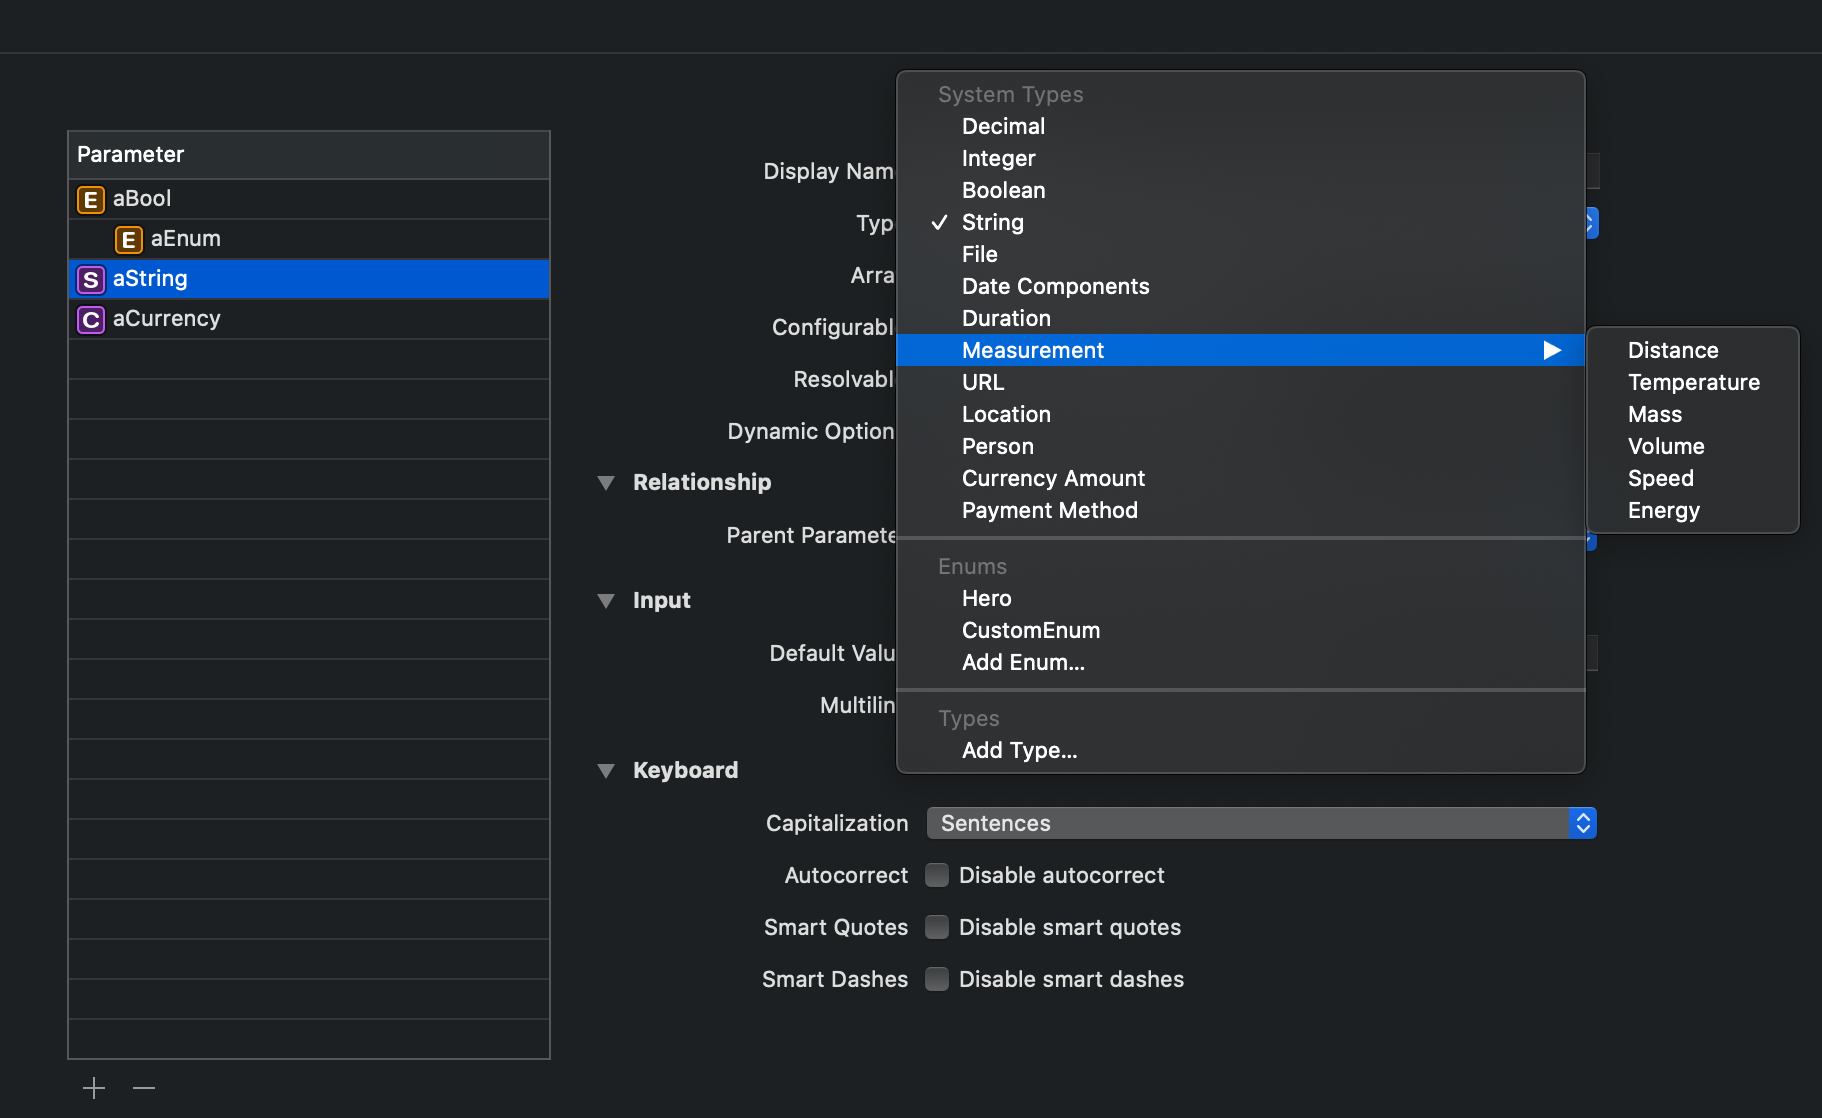
Widget 支持配置从整型、字符串等基础类型到日期、URL 等高级类型的参数,同时支持自定义参数类型和枚举类型。特定的类型还有近一步的自定义选项来定制输入 UI。
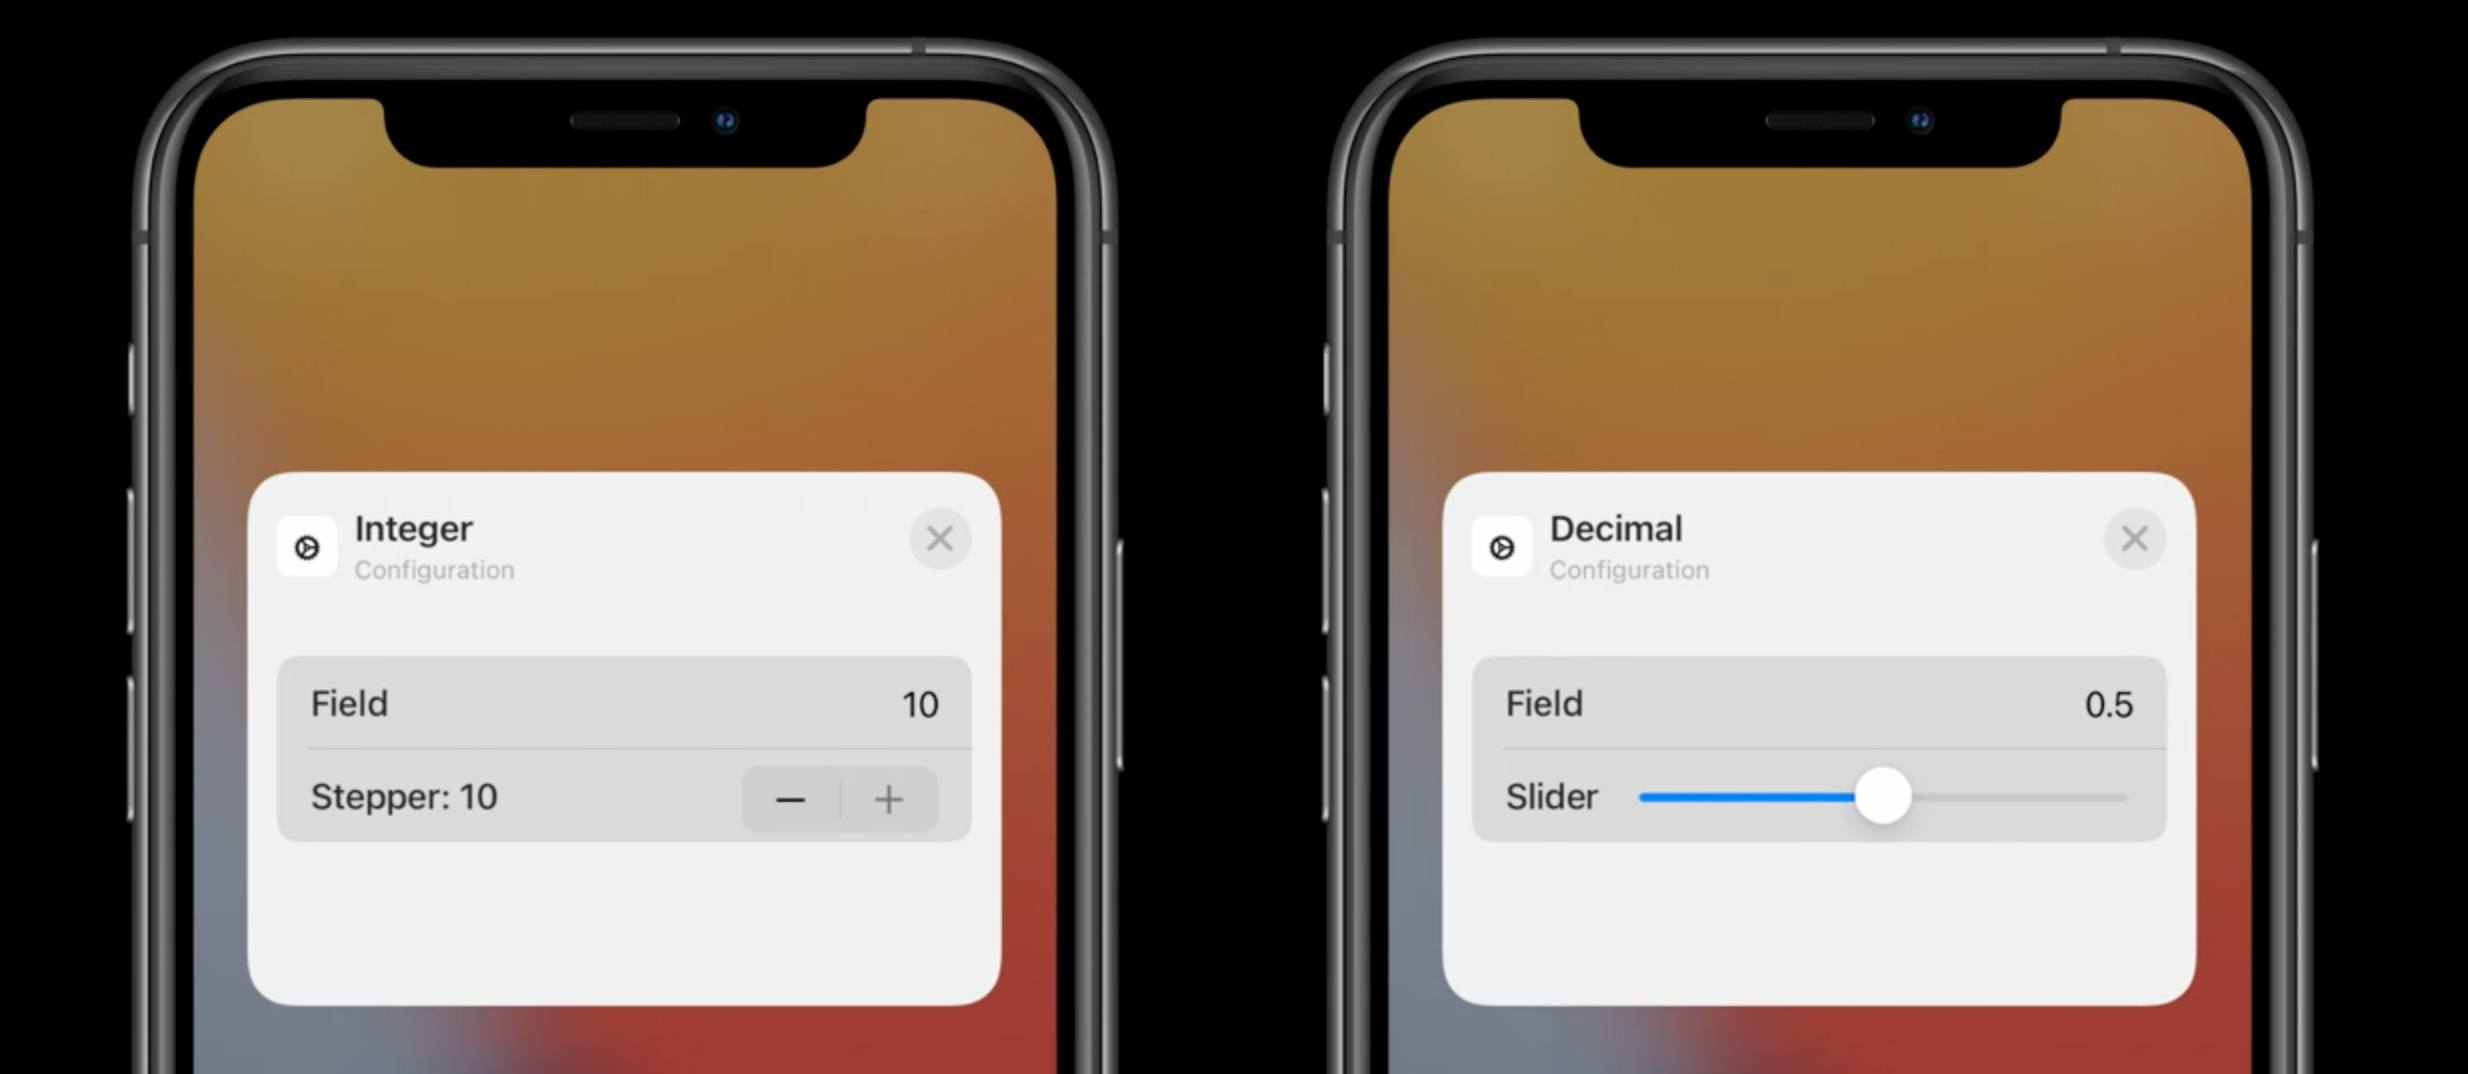
比如,Decimal 类型可以选择采用输入框(Number Field)输入或者是滑块(Slider)输入,同时可以定制输入的上下限;Duration 类型可以定制输入值的单位为秒、分或者时;Date Components 可以指定输入日期还是时间,指定日期的格式等等。
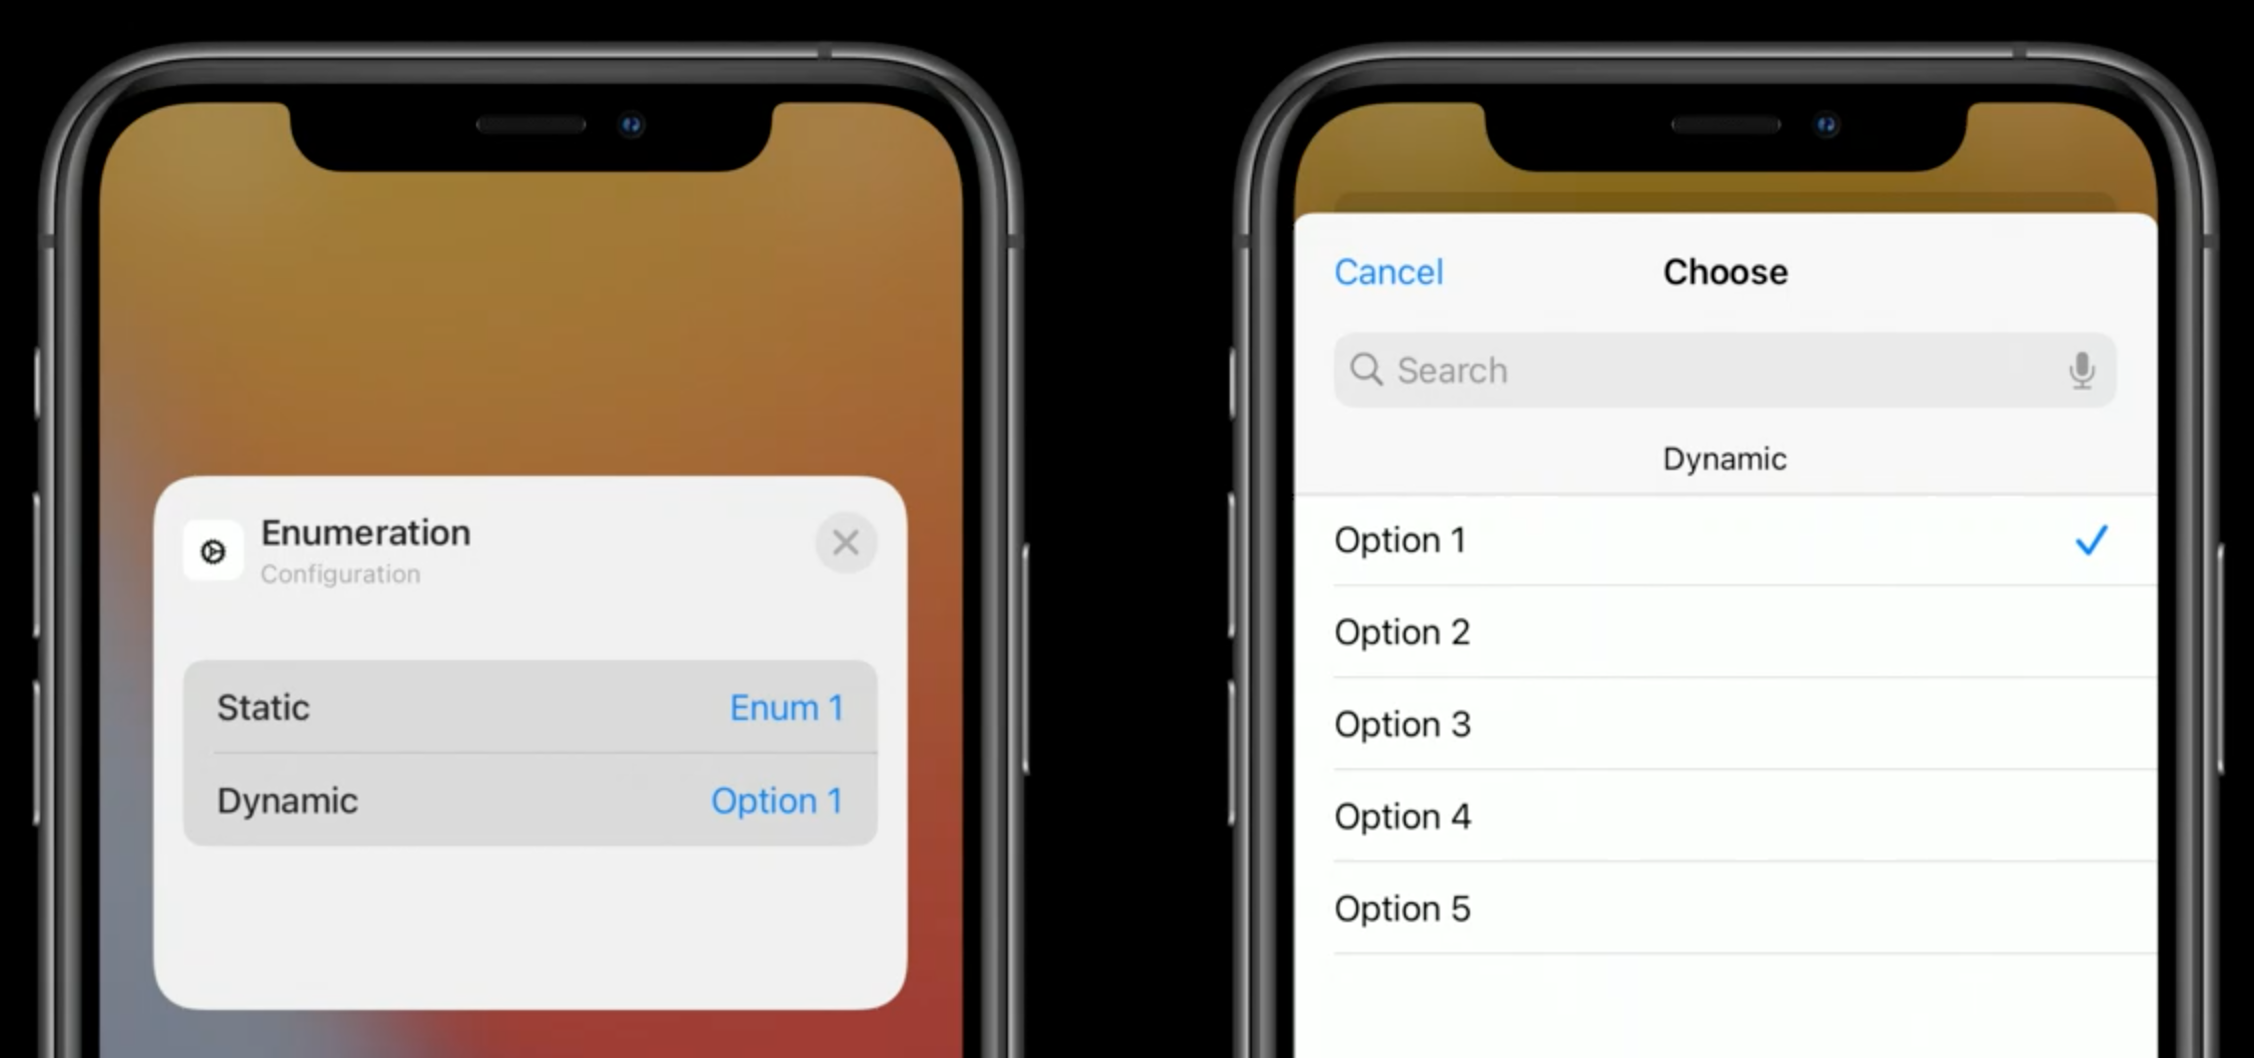
自定义枚举或者参数类型
不同参数之间可以设置依赖关系,比如日历 App 的 Up Next Widget,仅在 Mirror Calendar App 选项没有被选中时,才会显示 Calendars 配置项。
在 Intent 定义文件中,将某一个参数 A,设置为另一个参数 B 的 Parent Parameter ,这样,参数 B 的显示与否就取决于参数 A 的值。
注意事项
- 增加了 intent 或者 parameter,可能需要 rebuild 或者 reboot Xcode 🙂️ 才能促使其在生成的文件中添加对应的变量。
-
新增加的 Intent 文件,注意 target 需要勾选上主 app,否则会出现编辑小组件时加载「Unable to load」的情况 [Xcode 12 beta 3 WidgetKit Unable t… Apple Developer Forums](https://developer.apple.com/forums/thread/655245?login=true)
那么,如何解析用户选择的参数呢?以 Enum 参数类型为例,
func activityDataType(for configuration: ViewActivityTypeIntent) -> KEPActivityDataType {
    switch configuration.activityType {
    case .training:
        return .training
    case .yoga:
        return .yoga
    case .running:
        return .running
    case .hiking:
        return .hiking
    default:
        return .unknown
    }
}
其它
Intelligence
Siri donation,考虑 Intent 中参数的组合,在某些用户行为下,donate 一个 intent

颜色和字体
如果需要使用主项目中的资源,需要将资源的 target 勾上 Widget extension。另外,如果是字体,还需要在 Widget 的 info.plist 中增加该字体的描述。

多个 Widget
有两种方式,
- 同一个 Widget,通过
@Environment(\.widgetFamily)获取 Widget 的尺寸,并适配 UI
	struct EmojiRangerWidgetEntryView: View {
    var entry: Provider.Entry

    @Environment(\.widgetFamily) var family

    @ViewBuilder
    var body: some View {
        switch family {
        case .systemSmall:
            ZStack {
                AvatarView(entry.character)
                    .widgetURL(entry.character.url)
                    .foregroundColor(.white)
            }
            .background(Color.gameBackground)
        default:
            ZStack {
                HStack(alignment: .top) {
                    AvatarView(entry.character)
                        .foregroundColor(.white)
                    Text(entry.character.bio)
                        .padding()
                        .foregroundColor(.white)
                }
                .padding()
                .widgetURL(entry.character.url)
            }
            .background(Color.gameBackground)
        }
    }
}
- 编写不同的 Widget,通过
@WidgetBundleBuilder组合在一起。使用@main标记
@main
struct EmojiRangerBundle: WidgetBundle {
    @WidgetBundleBuilder
    var body: some Widget {
        EmojiRangerWidget()
        LeaderboardWidget()
    }
}